Tuesday, September 28, 2021

Wardrobe for business profile portraits and headshots

For best results I suggest the following general wardrobe guidelines for head and shoulders portraits for your consideration. 

Please note that if we are shooting against a green screen it is critical you not wear green.

1. Try to stick to predominantly solid, neutral colours, and mid-tones (ie. not white or black) although a white or contrasting shirt can work underneath a suit jacket.


A white shirt works under a suit jacket.


Photo (right) - Unsplash

2. A splash of colour can also work well and add some spark to a portrait.
 

A colourful scarf can add spark.

3. Busy and large patterns should be avoided, as well as very small patterns such as fine checks and houndstooth which can cause a distracting moire effect.


4. With a shirt and tie, the shirt should be a solid colour. Any stripes or pattern can make retouching of wrinkles impossible.


 Photo - Unsplash

5. With dresses and tops higher cut necklines tend to work better because aesthetically it is preferable for the top of the dress or top to be included within the image frame.

Typical head and shoulders crops - 4 great necklines and one less great Photos - Unsplash
 

6. With dresses and tops, three quarter or long sleeves tend to be more flattering than sleeveless tops, as long as they are not ill-fitting, and work better with portrait crops. Short sleeves may not work as well visually as sleeves that extend beyond the edge of the portrait frame.

The safest option for a flattering head and shoulders portrait will often be long sleeves.
 

7. Wear something that is flattering on you (ie. has flattering lines and shape), and fits you properly* and comfortably, without pulling or sagging, not too tight or loose, and without extra fabric in areas such as where the sleeve joins the bodice. Note that in general cardigans look less professional than other options. Beware of undergarments that show through tops; noticeable bumps may be distracting and difficult or impossible to remove in retouching.


Avoid sweaters and loose clothes. And watch for distracting wrinkles and bumps that won't be fixed in retouching.

8. If you wear a jacket make sure you can comfortably do up the top button. 

Not like this. Photo - Unsplash


9. Lean towards jackets that zip up or button up to form a 'v' underneath the face, as opposed to jackets that don't have buttons and/or that can't be done up. Also, in general, it is best to avoid double breasted jackets.

There are no hard, fast rules here, just a somewhat aesthetically conservative suggestion.
 

10. If your outfit allows for it consider wearing pants with pockets. Being able to put hands in pockets can facilitate a relaxed standing pose.

11. Avoid clothing styles that are likely to date quickly (ie. trendy styles).

12. Keep in mind that generally viewers of your portrait should be noticing your face, foremost, as opposed to your clothing or jewellery, so it's often best to keep them understated (unless you are a clothing or jewellery designer).

13. If you are not sure what will look good, time allowing, consider bringing options -- cleaned and pressed and on hangers (not folded).

14. If you plan to wear something that wrinkles easily consider bringing it to the shoot cleaned, pressed and on a hanger to put on right before your session.

15. In the absence of a Hair and Make-up artist be sure to be as camera-ready as possible -- clean teeth, lips moisterized (avoid dry, chapped lips), lipstick, etc. touched up, if applicable. Consider bringing your make-up kit (if applicable) for touch-ups. Due to the pandemic we no longer apply shine  reducing powder, for now, so you may want to bring your own.

16. If we are hiring a hair and make-up artist please make sure your hair is NOT FRESHLY WASHED. Freshly washed hair can very difficult to style.

If I have missed anything glaringly not covered please let me know.

* Post-pandemic many of us do not have the quite same bodies we went in with. If nothing fits right and you haven't had to dress for the office in while, please consider buying something new that fits your current self.

Wardrobe is obviously very personal and what is considered to look good is a subjective thing. These guidelines are intended to provide some tips on common pitfalls that can detract from the awesomeness of a professional portrait. Hopefully with these in mind readers will show up for portrait sessions feeling confident and looking great.

kathryn@hollinrake.com

hollinrake.com


Tuesday, September 14, 2021

Is it Photo Day yet? And the importance of backgrounds.

What you might see when I am photographing you.
  

I have to admit I have started and stopped writing and revising this post multiple times over the past two months, as I navigated the uncertainty we are probably all to various extents still feeling. No time ever felt like the right time to reach out about doing corporate (or any) portraits. But I think now that September is here and summer holidays are done people may be more receptive to embracing the need for updated photography. And likely by now if you’ve wanted a hair cut you’ve been able to get one, and if you’ve decided to forgo colouring your hair your natural colour has grown all the way out. You may also be part of the growing and overdue movement to start embracing your naturally textured hair.

Also helpfully, we are further along to road to coming out the other end of this pandemic. As I write almost 80% of adults in Ontario my age group are vaccinated (including me). And we continue to observe Covid protocols on shoots. So we are finally, truly, back in business.

Yes, for many people it will be high time for an updated profile portrait or updated staff or leadership team portraits, so where to start?

3 things to do to prepare for a portrait shoot:

1)   Step 1 is to book a hair cut if you haven’t already. With reduced capacity at salons it may take longer than usual to get an appointment with your stylist, so you may need more lead time than usual.

2)   Find something flattering to wear that fits, a more challenging task for many due to after effects of the pandemic. I have a wardrobe blurb I share with all portrait clients, and one of the most important points in it is to wear something you feel great in and that fits nicely…not too tight or too loose. With any button up top or jacket you want to be able to do it up without any strain. So, it might be time to buy a new jacket. (If you’re interested check out my video on wardrobe for video calls, adapted from my portrait wardrobe guidelines: https://youtu.be/LMRoP8NIVJY )

3)   Think about where it makes sense for you and your team to shoot. With many still working from home it may be that shooting at your office is no longer the best option. These days we divide our time shooting at office locations, my studio, and people’s homes, and often you can’t tell from the resulting portrait which location we were in because…green screens! Yes, I am talking about this technique again. Read on.

 Beautiful Backgrounds, Beautiful Portraits - my latest author portrait


Author Judith McCormack in my studio

One of my first post lockdown portrait shoots this year was with lauded author of numerous award-nominated short stories and the brilliant novel Backspring Judith McCormack. I was excited to be able to provide her with the outdoor portraits she wanted without actually having to deal with the sometimes deal-breaking unknowns of shooting outside. For those following my updates you won’t be surprised to know we shot inside against a green screen. This meant we could relax and focus on the portrait knowing that I’d be able to take my time choosing the perfect outdoor environment from my archive after the shoot.

Here’s a link to a larger version of the portrait: https://hollinrake.com/portfolios/authorscelebrities

Here she is, alternatively, in a downtown interior:


Same portrait on another background from my archive

Of course sometimes we want the look of an in-studio shoot, and maybe a bit more drama. We shot the following example in studio against a 5x7 foot green screen.


Shot on 5x7 green screen; background is a 9 foot wide seamless.

The 9 foot wide gray seamless paper backdrop in the image was shot separately. A couple of advantages of shooting this way are 1) we can set up a much smaller set (in a living room for example) than is required to actually shoot against a 9 foot wide seamless (which requires a big space), and 2) we have the flexibility of deciding on the background later, and changing it as needed. 

Same portrait as above with a light gray background


The importance of backgrounds 

One of the things that distinguishes one portrait photographer from another is, of course, lighting, but as important is the art of choosing the right background. Some portrait techniques and scenarios really limit the options, compromising the potential impact of and message communicated by the final shot. When someone asked me recently about my favourite part of my job I thought of how I feel when I capture a particularly “perfect” background for a future portrait. At the time of my writing this I had just had one of these moments. Having returned from a trip to Oakville to shoot gardens, specifically as backgrounds, I was reviewing the images in full resolution and came upon one that I just didn’t want to stop looking at. So I made it as large as possible on my monitor and just came back to it repeatedly in between working on other things, to get that little hit of joy, the way you do when you look at a piece of art you love, over and over.


An outdoor background from my archive


The next best part is carefully and artfully selecting the appropriate background for a specific portrait and placing that person into that background, and watching the whole portrait come together in a way that could not even have happened without the magic of the green screen. Because while I do shoot these backgrounds as if there is a person there, focusing on an imaginary subject in the foreground to blur the background in camera (because blurring it later in Photoshop will not look the same), actually photographing that person there may have been, in most cases, pretty much impossible for a number of reasons.

Corporate photography might look a little different post-pandemic but there have been some silver linings. I LOVE not being limited by (often) boring available backgrounds. And as a wish-I-could-have-been-a-painter photographer I love the art of creating portraits in this way. I am growing my archive of indoor backgrounds, too, so if you work in an attractive building that is still somewhat empty these days I’d love to drop by and capture a few blurred and unidentifiable but suggestive-of-a-business-environment backgrounds.

Backgrounds make me happy.

If you haven’t seen my previous blog post on green screen shooting please have a look at this where I talk about the advantages of the technique on more detail: http://khollinrakemakemepretty.blogspot.com/2021/04/why-i-love-shooting-portraits-against.html

You can also see a mini-portfolio of green screen portraits at: https://hollinrake.com/pdfs.

Where to shoot wasn’t typically often a question in the past, as more often than not we would come to clients at their offices and organizations. But this has changed. I’m curious to see who goes back to the office, who adopts a hybrid model and who has shifted to a more permanent WFH arrangement. From a photography point of view we can accommodate portrait shoots almost anywhere as there’s almost always room for a green screen. (And no, we don’t HAVE to use a green screen. We can, of course, shoot the ‘normal’ way if there’s somewhere nice and appropriate to shoot).

That said it seems to be working for organizations to call people to the office on a selected date for profile portrait shoots. It has been interesting photographing people who were hired during the pandemic and have never set foot in their organizations’ offices, and who are now meeting colleagues in person for the first time. This certainly has the potential to add a level of stress for those who don’t love having their pictures taken, something to keep in mind.

And that's it for my latest blurb on portraits and backgrounds. I hope this may have filled in a few gaps for the reader. Thanks so much for your interest! And please get in touch if you need photography for your business. I look forward to working with you.

kathryn@hollinrake.com

hollinrake.com


Tuesday, April 6, 2021

Why I love shooting portraits against green screens


Cover of CCNM's 2020 Annual Report


Yes, I am going to write one more article on shooting portraits on green screens. Why? Because this is my favourite new way of shooting "environmental" portraits and I want to explain. I love environmental portraits, ie. portraits that look like they were taken somewhere other than in a photo studio. They tend to be more interesting, and more creative and more layered in terms of the story they tell. But for many reasons actually shooting in an appropriate and visually appealing environment is often either not possible, or it would be way more trouble than would be justifiable. Shooting on a green screen lets us visually put a subject where they want to be, regardless of time of day, weather, lack of a beautiful board room, or any other logistical concern.


It was green screens that made it possible for me to shoot one of my favourite annual reports ever this past fall, so I’m going to illustrate most of this article with examples from that project. Initially, due to Covid, the brief was that we’d have to shoot outside, or mostly outside. To be honest, I was horrified. You know if you read my previous post how I feel about shooting outside. On location…yes! Outside…really?…Is there really a good reason to shoot outside? In this case, yes.


The situation was that they needed over twenty beautiful, potentially full page portraits of individuals, no pairs or groups this time to be Covid safe although we did end up doing one informal socially distanced group portrait for the student association.


Informal socially distanced group shot outdoors


I proposed we shoot on green screen for several reasons:

- By the time we were going to be scheduled to shoot fall would be well underway and it would look like it…leaves turned and falling or fallen off trees, foliage withered, flowers gone, duller looking days.


- There weren't very many pretty outdoor backgrounds to choose from at the organization’s campus where we’d be shooting, certainly not enough variety to do twenty plus distinct portraits.


- If we shot outside on the backgrounds that did exist we’d have to time all the shoots so that the light was right at each location at the right time…that would have made logistics much more difficult, and the time needed to shoot potentially much longer.


What was the process?


Before they even approved of the green screen idea I headed out, on a weekend, to start collecting background images because I knew if I waited I’d run out of opportunities and options. And they didn’t want fall backgrounds…they wanted summery backgrounds. Furthermore, I knew I’d be able to use the images as backgrounds for other shoots even if they chose to go in another 
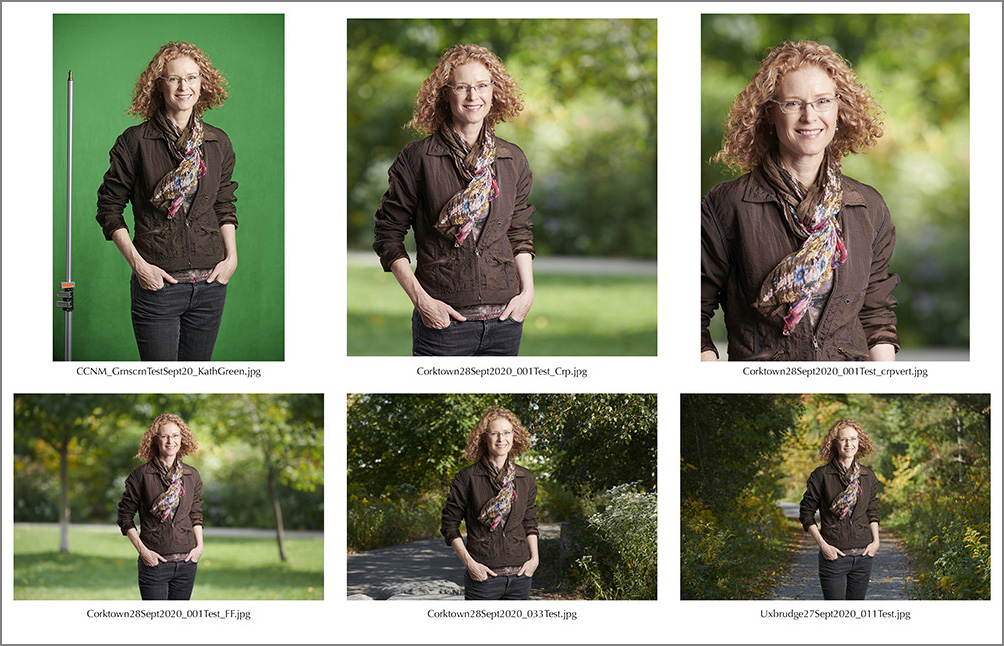
direction. After I had a few initial background shots I photographed myself in studio dressed as If I were outside and mocked up a few test shots.


Contact sheet showing rough concept/test shots

This confirmed for me and for the client that the concept would work! So over the next few weeks, when I had time and the weather was right I went out background hunting, driving to parks and locations in and around Toronto. And when I could I grabbed site specific shots for them on their campus, until I had a nice selection. I wanted a variety of looks, so sunny days and less sunny days, light coming from a variety of directions but never full on frontal…ie. from behind me shining straight onto the landscape. It needed to be coming from one side or the other, or from behind, ie. backlit. I was always imagining what the scene would look like as a background with a person in front of it. So I composed the shots as if there were someone in the frame, focusing on the imaginary person, visualizing how they’d fit, making sure there was unencumbered space for a person such that nothing would be sticking out from behind their heads or looking distracting. And I shot some horizontal and some vertical.


Knowing that aesthetically we would want a very limited depth of field look for the portraits (ie. sharp person, blurred background, based on the inspiration shots in the brief…almost all close-ups with beautiful bokeh backgrounds) I was careful to shoot with a wide aperture, again always focusing on an imaginary person in the foreground. It was important to do it this way because blur created in-camera looks very different from blur created in Photoshop. If you want bokeh, those lovely lens-induced shapes you see in the out-of-focus parts of photographs, you need to shoot for them. (Yes, there are ways to add a bokeh layer when Photoshopping an image, but not in a way that would be practical or work with these types of images). So, to be sure I’d get what I needed I had to bracket the amount of ‘out-of-focusness’, in case what I thought would work didn’t make visual sense once I placed a person in the frame.


The other tricky thing is that the amount of background blur and bokeh that make visual sense vary hugely depending on how much of the person is in the frame. The bokeh photographers and film makers swoon over tends to occur in close-ups. But, the designers needed me to shoot everyone down to upper thigh, as again, they didn’t know ahead of time how any one portrait would be used. Generally the wider angle the shot, and the more space around the subject, the more in focus the background will be, so it doesn't work to have a ton of space all around the subject but have it be blurred out the way it would be when you shoot a close up of a person with a long lens and a wide open aperture. It just doesn't look right partly because it's not what we're used to seeing.


Left: Too much blur in the background to make visual sense behind a torso portrait. It looks fake. Right: Makes much more visual sense when cropped to a close-up.


This meant I had to be very careful to shoot for flexibility, while not sacrificing aesthetics by shooting too wide and/or too sharp. I was also careful to include visual cues that might help the illusion of reality by, for  example, ensuring foliage at the edges in the foreground remained sharp so that a sharp person placed beside it would look correct.


Foliage in line with the person is sharp.


I did shoot some beautiful bokeh-heavy backgrounds for more close-up portraits in case they did end up being able to crop any of the portraits tighter. The way this one (below) fit in the layout allowed it to work perfectly. 


I also had to think about the angle, and height of the camera vs. height of the people I’d be shooting, as some would be tall and some short, and I changed the camera lens for different looks noting I’d have to be sure to do some of the portraits with the different lens too. All this without knowing anything about the actual people I’d be photographing, where in the report they’d be featured, whether the images would be big or small, horizontal or vertical, closeup or medium view/torso.


Later doing the green screen shots, I basically randomly varied the camera angle knowing I had different angled backgrounds, and randomly lit them differently so that certain portraits would work better on certain background shots. Because I didn’t know which backgrounds would go with which people I just made sure I shot enough backgrounds that I’d be covered for sure. Ultimately I had a pile of assorted images of people and backgrounds to mix and match.


When it came time to start shooting the portraits the weather was in fact on the way to winter. Weather days (ie. postponements) were not an option, though, so at first we gamely did whatever we could to keep working outside including finding a slight overhang we could shoot under, unless there was wind AND rain. Regardless of inclement weather it was still a challenge shooting outside as we had to move the whole set repeatedly each shoot day to get out of the wind as it changed and out of the sun as it moved. We even had to secure the light stand to a fence at one point making it more time consuming to move. Although we did actually have a few sessions scheduled for inside, we ended up bailing on the outdoors one particularly frigid afternoon after braving the wind all morning. Luckily there was a huge, spacious, well-ventilated room we were allowed to use (while of course observing strict Covid protocols).  


Left: Wind is blowing and sun has crept into the shot...no good! Right: Final shot...no cues that there was a gusting wind. 

Left: Green screen attached to a fence with wind blowing and tree branches encroaching. No problem...they're green! Right: final shot.

I have to say, it did actually feel pretty great to be outside all the time that we were. I love being outside. I just don’t love the stress and possibility of compromise of quality and control that can come with shooting outside.


Whether we were shooting inside or out, we lit the portraits. Inside we had to be careful to light so that it looked as if we could have been shooting outside. And outside we still had to be thinking about shooting loosely for the various backgrounds I had collected. We also did at least one portrait outside that had to look as if it was done in studio.


It was freezing when we shot this outside, same spot as the shots above.


Once I had all the people shot, selects made and retouched it was time for me to see who fit into what background and where they fit in the background. This was the fun part. Final images were submitted to the designers without cropping so they’d have maximum flexibility in terms of final crop and position in the layout.


Left: My final image which wasn't actually too far from the way it fit into the layout (right).


And finally, some of the background shots were requested as-is to be used full bleed on copy pages which I thought looked fantastic.


Left: Original portrait. Middle: Final portrait. Right: Background shot used on copy page.


I did have a brief moment of panic that this project was going to be way more difficult and time consuming to pull off effectively than I had thought (like the therapy dog calendar I did the same way, which was a nightmare!) but it wasn’t, mostly because of all the prep I did over-shooting backgrounds so that I was covered when a bunch of them didn’t fit or work.

Everyone followed the instructions not to wear green, and if there was a bit of green in a patterned top I just had to add one more step in retouching to put it back in after the chroma key software removed it. Same process for subjects who had green eyes.


Left: Original portrait. Middle: Green bits missing from the pattern on the top. Right: Final image in the report with the green put back in.
  

Overall I was so happy with this project…thanks to the pandemic I kind of got to reconnect with the magic of photography…all those years ago it started when I watched a print appear in the developer tray, and because the shut downs gave me time to explore and experiment I came across this fantastic software that allows for near flawless chroma key knock-outs.

And I do want to note that while this project consisted of individual portraits the technique can work perfectly for pairs, as in this example from another project:


Covid-19 precautions meant we couldn't actually photograph these two subjects together.


And could work equally well for small groups.  


How does all this potentially help you?


I am now shooting more portraits on green screens than not. I love the flexibility, control and creativity this technique affords me. It gives me so many more options in terms of being able to create just the right overall look for any portrait depending on the client’s brand and particular needs. I can tailor the background to the person’s look, what they’re wearing, what feel is appropriate and what will really make their portrait sing.


The final portrait can appear to be inside or outside, so no worrying about whether the weather is going to cooperate, or what time of year it is. We can do a beautiful outdoor summer portrait at any time. Or I can put a person in an image suggestive of a nice looking boardroom without having access to one. Or if there's a gorgeous photogenic boardroom but it’s not available when the person we need to shoot in it is, I can shoot the boardroom when it’s free, and shoot the person separately somewhere else. For that matter any space that would make a great background, even one that’s not in a  place where you could actually set up a shot for whatever reason, can be shot separately and composited in.


For this client (below) the backgrounds I chose were outside on their office deck (it was winter and the day of the shoot it was raining, as it happened) and at a height that would not be conducive to shooting portraits in front of them, so on a sunny day, pre-shoot date, I went to the location to scout and shoot background images (plates), and post-shoot I composited them in. This client also requested a plainer version of each portrait so I used a simple  digitally created background as well.


Left: Portrait shot inside. Middle: Background shot outside on the deck at clients' offices. Right: Alternate, plainer background requested as an option.


Another important technical bonus one gets from shooting on a green screen (or any plain background)…you can shoot using a higher camera angle (more flattering, especially for people with a little extra flesh under their jawlines) without having to worry about converging verticals. If you shoot down on a person in a real environment any vertical lines will be distorted in a visually distracting way, but using green screen, because the background is separate you can 'cheat', so this is a potentially more flattering way to shoot.


Left: Mock-up to illustrate what can happen to architectural vertical lines in a background when camera is looking down for a more flattering angle. Right: Final image delivered to client who was shot against green screen, and the vertically correct background image composited in.


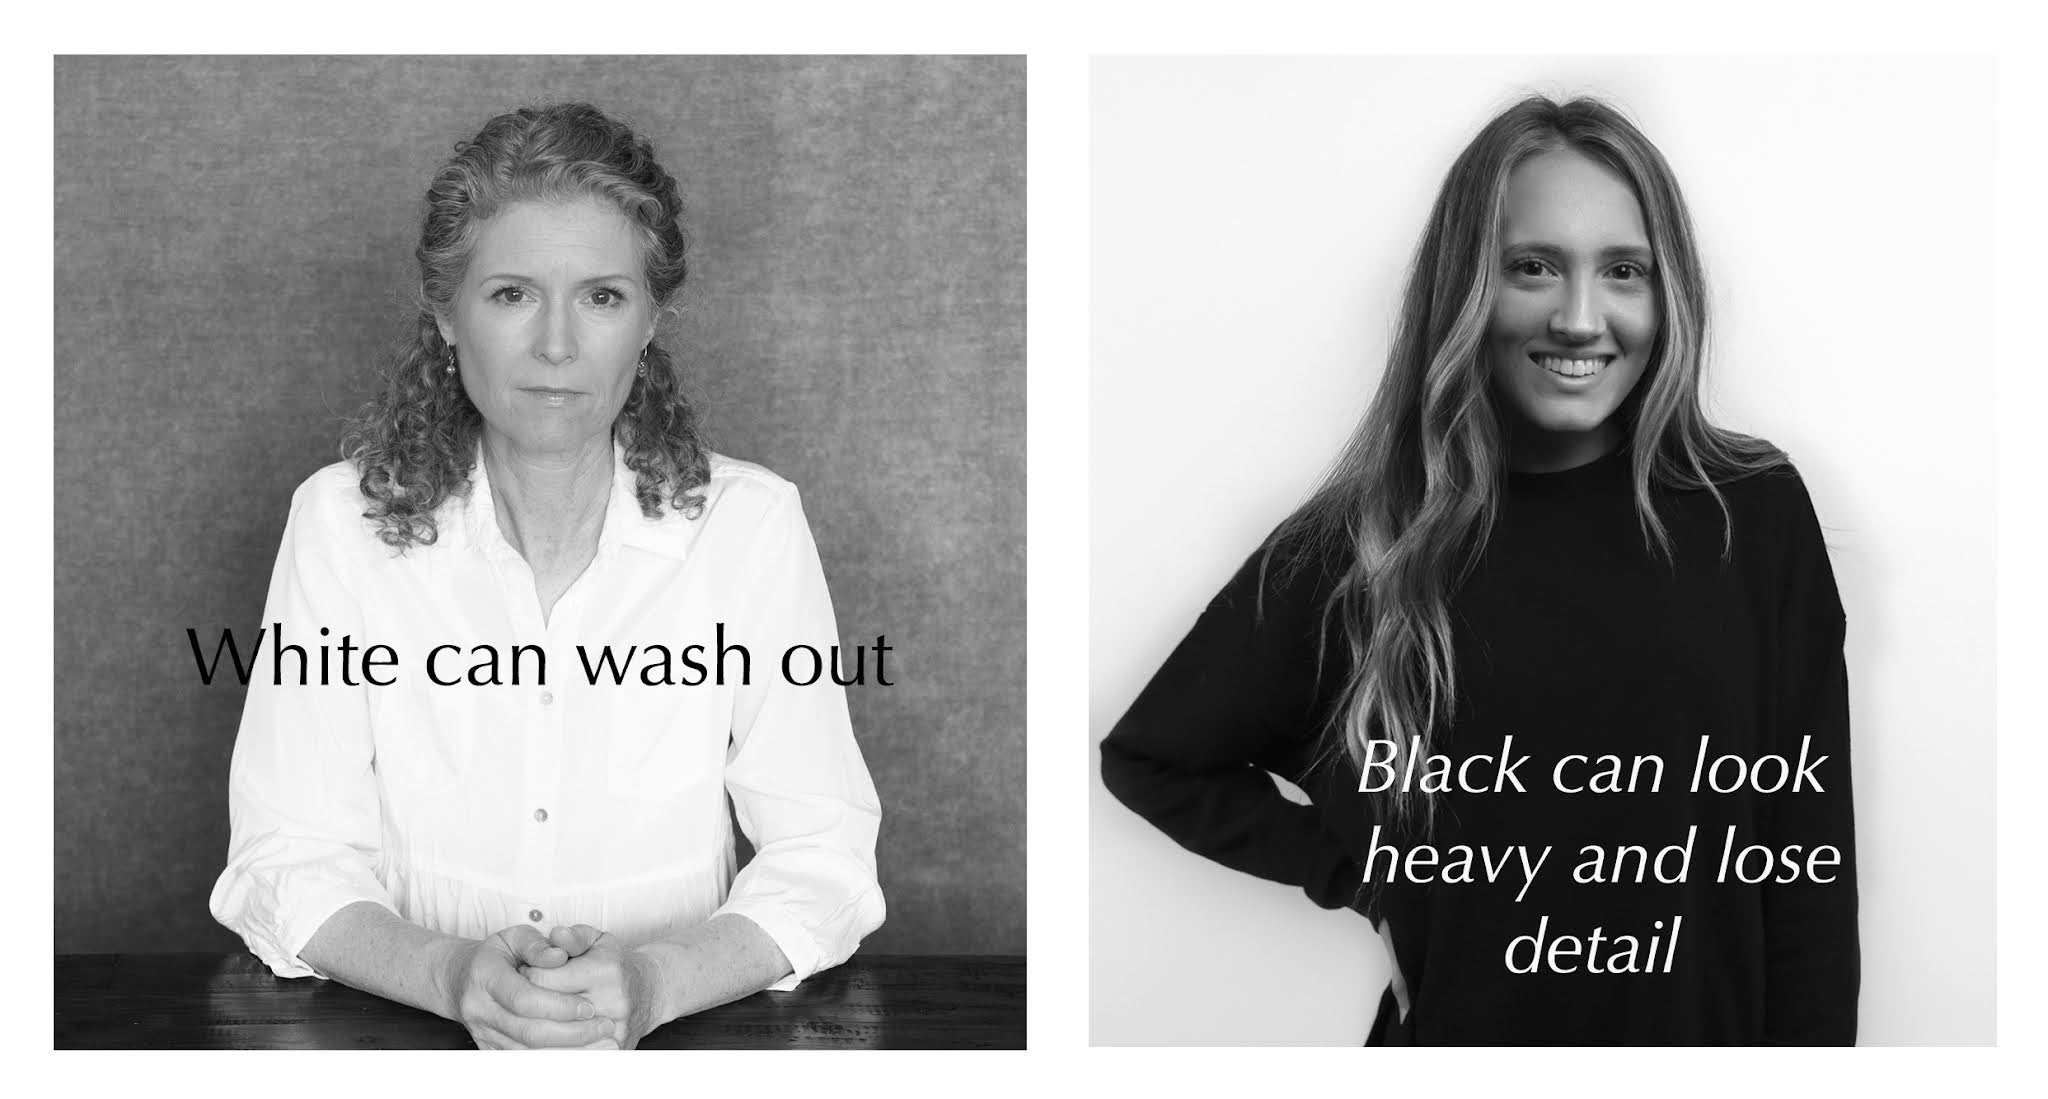
I know some people advise shooting on white for the most flexibility, but in my opinion I prefer green screen with a few exceptions (such as the need for a white background in the final image). We need less gear than you do to shoot on a white background and as a result can get away with shooting in a marginally tighter space. And unlike white backgrounds green screens don’t reflect white onto the subject (nor do they reflect green as long as you set up properly) which can fill in shadows where you don’t actually want them filled; in other words, when you shoot on white you can get highlight spill on the person around their edges which can make the cut-out look cut out. You don’t get this unwanted light spill with green screen so it’s easier to produce a final image that looks realistic. And close-cutting on white properly can take more time and add more cost than using high quality green screen removal software.


Mock-up to illustrate what can happen if a portrait is shot against a white background and the light spills/reflects onto the subject...she looks cut out against this dark background.


And the final reason I love shooting on green screen: you can always go back and change the background in the future to refresh a portrait. 


As mentioned, you've just got to avoid subjects wearing green clothes and watch you correct for and retain green eyes. The final caveat is that this technique definitely works best for portraits in which the subject is free standing or sitting, not interacting with the “environment” in any way like sitting on a couch or leaning against a table or wall. For those more lifestyley shots we’d still need to shoot on set.


And that's it for my green screen treatise! This was a long one…if you’ve read until the end, thank-you so much! I hope this gives you a better understanding of some of the advantages of shooting on green screens. If you'd like to see more examples here's a link to a small portfolio PDF: https://hollinrake.com/green-screen-portrait-portfolio-pdf.


Please get in touch if you’d like me to help put you where you want to be!

kathryn@hollinrake.com

holllinrake.com


Thursday, January 28, 2021

Pandemic Lockdown Portrait Shoot

 Sub-title: Shooting against a green screen in a back yard in the middle of winter

Malene's final selected file (photographer's version), comp'ed into an outdoor background 

January 2021. It has been a mighty tough time for so many people and not great for photographers of people. As I write this we are in a lockdown that for the most part precludes shooting, for obvious reasons. However, recently an old friend and colleague called to ask if there might be a way to do a headshot as her new career launch schedule had just accelerated somewhat unexpectedly and she had to have a professional portrait pretty quickly. She said that she wanted an outdoors shot which would fit well with her 'personal brand' (my words), and would allow us to shoot at a time when visits to indoor locations for any unessential purpose are forbidden/discouraged/not cool. So we chose her backyard as our studio. 

I can tell you that as a photographer who has frequently pushed back at the idea of shooting outside unless there is a really good reason to do so due to the many varied many and varied potential drawbacks, but who was also dying to be shooting again, I leaped at the opportunity to make it happen with the caveat that there would be a few necessary compromises that we'd need to discuss and understand ahead of time. Things like my not being able to bring an assistant which meant my lighting would be a pared down version of what I normally do. And it would be cold, which would make it tough for her to look relaxed and happy. And I probably wouldn't be able to style her properly. So we set out secure in the knowledge that we might not actually succeed.

 Before I go on I want to note that the image above is the one I optimized to a level that I felt satisfied with. Malene felt very strongly that her likeness should not be enhanced in anyway as in her profession as a psychotherapist authenticity is crucial. So for her version I had to stop short of what I'd normally do. 

Here's the above portrait right out of the camera:

The sun kept going in and out meaning that the contrast ramped up, ie. the shadows got darker than I wanted every time the sun went behind the clouds.

And here's the version Malene approved for her purposes:

The version Malene approved is less retouched than my final version.

So how did we do this? The first thing we did was choose a date based on both the weather forecast and her availability. Of course the day before the shoot date the weather forecast changed and the pre-shoot day swapped weather with the shoot day… so we had sun on the pre-shoot day and clouds with snow in the forecast for the shoot day. Excellent! But we didn't want to postpone because temperatures were slated to drop by the following week, so we went ahead. Believe it or not I actually brought a fan, because Malene has fine hair which is longer than usual due to salons being closed and I knew a bit of a breeze in her hair would give it some volume and life. As it happened there was an actual wind so we didn't need to create one. Thankfully, periodically, it came from the right direction! In between it did things like this:

Obviously the goal was to shoot when the wind caught her hair perfectly, just enough to give it a little volume and life (not like this).

We knew we weren't going to use stands for the green background as we needed to keep gear to a minimum and didn't want unmanned stands holding up what would effectively be a sail in the wind, so we tacked the green screen to the one fence that faced away from the ever-changing light (sun going in and out) and was tall enough to fill the frame behind a standing subject. Thanks to 36Pix's brilliant green screen knockout software the fact that the screen was not lit perfectly or stretched perfectly didn't really matter.

How uninspired does this scene look?! The hero shot at the top was taken when it was overcast like this.

As I mentioned above one of the most important things when doing portraits is to make the subject comfortable. A profile portrait shoot is not like a fashion shoot where models get paid a bunch of money and have to suck it up and look warm in summer wear during between season shoots. There was no way Malene was going to be comfortable wearing a T-shirt outside in just above 0° weather, but she was willing to power through it. And I knew I was going to have to retouch out some nose and eye redness. When the sun did come out spasmodically, the slight increase in warmth was hugely welcome, for Malene anyway. And aesthetically it was nice, throwing lovely backlit highlights onto her hair.

An alternate version, not retouched at Malene's request, with different hair, sunny highlights and a different background.

Other compromises included using a far smaller light modifier than I normally would, and using only one light, resulting in harsher shadows on Malene's face which I had to mitigate during retouching. I am a big believer in getting the exposure as close to perfect as possible in camera rather than having to "fix it in post", but this time I had to work with what I got. And I knew I captured enough to ultimately achieve what we wanted.

It's an important step to be able to review captures with the client prior to wrapping, if at all possible, so as to ensure that we've really captured the magic (ie. shots the client loves). (If we haven't we shoot more.) But during Covid we have to do this at a distance, so I attached an external monitor to my laptop and she took that inside with the door cracked open so we could hear each other speak well I stayed outside. 

Left: Moving my laptop closer to the house. Right: Setting up an external monitor for Malene to take inside to review the images. Photo credit: Malene Johansen

Do I recommend shooting business portraits outside in winter, or ever? Well, let me summarize why we may question shooting shooting outside (beyond the obvious question of whether being outside is relevant to one's personal brand):

  • Can't control the weather
  • so shoot dates may have to change last minute
  • may have to deal with changing light (e.g. as sun moves), or not ideal light
  • may have limited control in terms of the direction of available light/sunlight relative to background and subject ie. the best available, most appealing background may not line up with the best light for the subject
  • lighting may be compromised unless extra crew is hired to man lights and appropriate modifier(s)
  • subject may be cold or hot (ie. not comfortable or relaxed)
  • may not be able to keep hair style, or make up under control

Unless a specific outdoor location is significant or meaningful to the portrait or the subject will be interacting with it… for example sitting on outdoor furniture or leaning on a tree, one might ask what the benefits would be to introducing all these variables into the equation when you can shoot indoors on green screen and put in one of the many backgrounds your photographer has collected in her  "outdoor portrait backgrounds" archive. ;-)

That said, it can be done! In October 2020 in between lockdowns when it made slightly more sense, and I do mean slightly more, to be outside, we did a huge multi-day people shoot outside on green screens, and in that case there was no "maybe"; the shots had to be great. I'll write about it in an upcoming blog.

Hopefully soon the world will open back up, and I look forward to working in close proximity to people again then! In the meantime if I may be of any assistance please do not hesitate to reach out. Thanks for reading!

kathryn@hollinrake.com

hollinrake.com